Tag Archives: outdoors

Mendoza, Argentina – Adventures

My bus trip from Bariloche took 19 hours. For such a long trip there are two different seat types on the bus: semi-cama, similar to airplane seats, and cama, which means ‘bed’ in spanish. For the overnight trip I went for the more comfortable cama seats, although while better than the semi-cama was nothing like a bed.  Comfortable as it was, I only got half a night’s sleep I arrived in the desert city famous for its wine.

Mendoza is a city of 850,000 people and my hostel, Hostel Lao, was a few blocks from the bustling city centre. After spending so much time in Patagonia, with its small towns and cities, to come to a big city bustling with people was a shock to the system. But once I got used to it, the jewel that was Mendoza began to sparkle.

DSCN2460

Still exhausted from my bus trip, I went out clubbing with a group from the hostel until 6am. The night life of Mendoza on a Friday night was certainly good, although beyond the smelly fact that smoking is allowed in their clubs, there were few issues for our little group of ‘gringos’ and an awesome night was had.

After spending Saturday quietly recovering, on the Sunday a small group of us headed out to Auga Termas. 45 minutes from the centre of town, the thermal hot pools were set in a beautiful location, hidden in a gorge between rocky ridges…

wpid-dscn2443-2013-06-9-18-32.jpg

There were many different pools of varying temperatures. Inside, there was a mud pool where you cover yourself, let yourself dry before washing it off in the blast showers. Included in our visit was a huge buffet lunch, Argentinian style. We ate and ate then enjoyed a couple of bottles of fine Mendoza wine outside in the sun, before heading back to the pools. Before we left, three of us had full body massages. A fantastic day.

A couple of days later I moved to Hostel Mora, a cheaper hostel just around the corner. While Hostel Lao was supposed to be the best hostel in Mendoza if not the continent, in my opinion, Hostel Mora did it better. Pretty much all hostels in Mendoza offer a free glass of wine each night, while Hostel Lao offered it five nights a week, on arrival Hostel Mora opened this 4.75 litre bottle of Malbec…

wpid-dscn2450-2013-06-9-18-32.jpg

The weather in Mendoza was brilliantly sunny. It is the desert after all and after 3 months in the colder south, it was nice to feel warm again.

DSCN2448

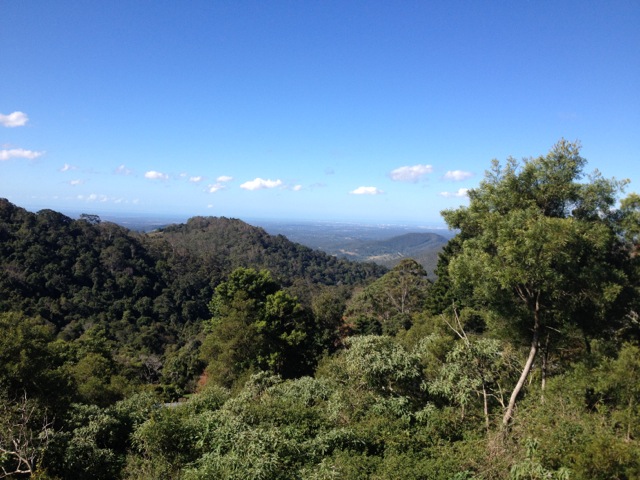
On the western side of the city is the massive Parque General San Martin and on the far side, another 45 minutes walk, is Cerro de la Gloria.  After a rough ten minute climb I made it to the top for good if not a little hazy views across the city. All trees in Mendoza are hand planted and watered using an irrigation system based on the snow melts of the Andes.

DSCN2456

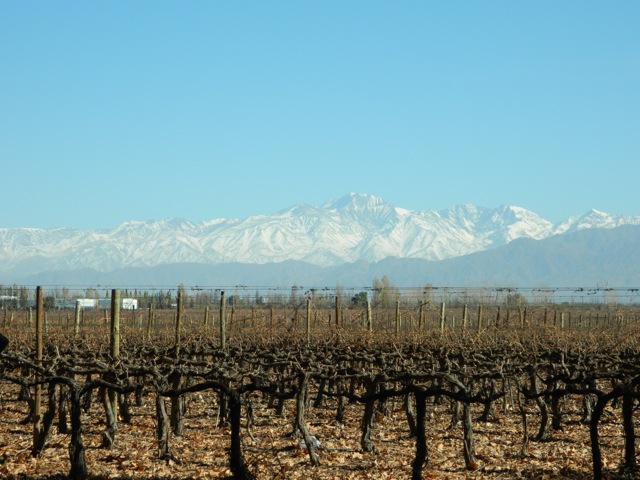
You can’t come to Mendoza without going on a wine tour. Some choose to be driven around but for the keen, bikes can be hired for next to nothing and a self-guided tour done.

DSCN2462

I’ve been particularly enjoying the Malbec, a type of red wine that is very popular in Argentina. Riding bikes around the roads of the wineries after many glasses sounds dangerous, but it was actually rather refreshing. So too was sitting at the bodegas drinking wine and enjoying the view…

DSCN2467

After eight days in Mendoza it was hard to say goodbye. I had such a fun time, drank an awful lot of wine and met some great people from all over the world.

Things to do in Mendoza:

  • Walk through Parque General San Martin
  • Climb the towering Aconcagua, highest mountain in The Americas
  • Cycle a wine tour around Maipu wine region
  • Cycle a wine tour around Luján de Cujo region
  • Visit one of the other 12 wine regions
  • Explore Witches Cave
  • Have a steak dinner in the city

Next I bused to Córdoba, the city at the centre of Argentina.

The Wine Cycling Trail Wanderer.

Cerro Catedral, Parque Nacional Nahuel Huapi, Argentina

After a week studying español in Bariloche it’s time to get back out on the trail. This weekend, myself and a companion from my hostel are planning to climb Cerro Catedral (yes it’s spelt correctly) to Refugio Frey, where we plan to stay the night and do some day walking around the lakes.

wpid-dscn2359-2013-05-20-15-28.jpg

Our original plan was to do a 3-day hike, walking on to the refugio after Frey, but the amount of ice on the higher trails meant the climb beyond Refugio Frey would be too dangerous.

We packed and caught the bus for the 20km trip to the township of Catedral, a town set up for the ski slopes above it. The weather was beautifully clear when we headed out and remained that way for the entire weekend. A rare weekend for this time of the year in Bariloche and perfect for the hike.

We headed out along a wide dirt road away from the huge car park for the ski fields. After a short walk, we left the road and walked up a short thin trail to the official beginning of the trail and a wooden hiker…

wpid-dscn2358-2013-05-20-15-28.jpg

The first part of the hike meandered south along the base of the rocky edifice of Catedral Norte, heading away from the chair lifts and the ski fields.

wpid-dscn2366-2013-05-20-15-28.jpg

Along some parts of the trail sat snow from an earlier snowfall, although much of it had melted leaving a thin layer of mud.

wpid-dscn2365-2013-05-20-15-28.jpg

The trail continued on its fairly flat way across the southern base of the mountains heading towards Lago Gutiérrez…

wpid-dscn2371-2013-05-20-15-28.jpg

The trail crossed many small arroyos flowing down from the mountain, many flowed beneath a layer of ice. This created some very beautiful natural icy sculptures.

wpid-dscn2364-2013-05-20-15-28.jpg

The trail rounded the base of the mountains, with a clear view of the lago as we headed west up the gully towards the refugio. The trail became icy as we walked and we had to watch our steps to ensure we didn’t slip off the path. There were sections of the trail that looked like normal dirt but you could occasionally put your foot right through it leaving a 10 cm deep hole. Ice forms in layers beneath the mud, pushing it up and making it fragile. Some places it was obvious, but other places you didn’t know it was there until your foot went through it. Beneath the ice was more dirt, so it wasn’t dangerous, just strange to walk through the icy mud. The ice itself hardens into layers of hexagonal rods about 3cm thick, and there always seemed to be three layers of the ice.

Walking through a cold forest gully, we avoided as much ice as possible. The climbing began across some muddy tracks until we came to a flattened areas where an emergency hut had been built under a massive boulder. The boulder slants down making the inside back wall of the hut. Inside there is a flat platform to sleep perhaps 3 people and a fireplace.

wpid-dscn2381-2013-05-20-15-28.jpg

With the light starting to fade, we pushed on along the gully, sighting the roofs of buildings at the top. As we walked, the top of the Cerro Catedral range could be seen off to our right with a light dashing of snow around its jagged peaks. We continued climbing up through some slippery mud until we came over the crest and crossed an icy arroyo to see the refugio ahead of us.

wpid-dscn2391-2013-05-20-15-28.jpg

Refugio Frey is expensive to stay in and provides little more than a mattress upstairs and no heating. We cook our food in a tucked away corner and settle in for the night with several other people including 3 young and rather noisy preteen boys.

It wasn’t too cold for most of the night, but as it headed towards day break it began to grow a little colder. I arose just before sunrise and headed outside with camera to catch the sun upon the mountains at the back of the valley beyond the frozen laguna. I watched the sun shine pink on the mountains opposite before lighting them up in a golden light.

wpid-dscn2396-2013-05-20-15-28.jpg

We decided to climb the wall of the valley to Laguna Schmoll. To get to the other end of the valley we decided to walk across the frozen lake. This was rather fun as it was fairly solid. The children at the refugio got out on their ice skates and stayed there for much of the day. At the far side of the laguna is the arroyo that feeds it, we walked across the ice but this wasn’t as solid and I broke through on two separate occasions. Thankfully, my trusty boots are waterproof, so it wasn’t too much of a worry.

The climb up the rocky wall of the valley was fairly easy, although there was snow in several places and some ice. This part could have been climbed with packs, but it was the next part that we weren’t supposed to do without crampons.

wpid-dscn2410-2013-05-20-15-28.jpg

Another pair of hikers had also climbed to the laguna, but they couldn’t speak english and I’m not totally confident with my spanish yet, so I left my companion to chat with them while I investigated this new valley.

wpid-dscn2411-2013-05-20-15-28.jpg

After stopping for lunch, my companion and the two other climbers decided to climb the icy wall without crampons (or packs). I scouted it a little and decided against it and let them go. On the other side of the lower valley is a ridge that leads to another set of peaks. This is sun drenched and has no snow or ice on it, so I decided to climb this instead.

I made my way back down the rocky wall and around the side of the laguna towards the short ridge, with the refugio across the lake.

wpid-dscn2420-2013-05-20-15-28.jpg

Then in the warmth of the sun, I made my way up the side of the ridge. It was an easy climb and standing atop it could see down both valleys. This is the mountain Pico Bara at the end of the ridge…

wpid-dscn2407-2013-05-20-15-28.jpg

The climb up Pico Bara was fairly easy and there were several different ways to climb it. It was a lot of fun, crossing from the back side with some snow, to the sunny side and back again. The views from the top were pretty impressive, both looking back along the valley…

wpid-dscn2429-2013-05-20-15-28.jpg

…and down upon the refugio a couple of hundred metres below.

wpid-dscn2427-2013-05-20-15-28.jpg

After a brief stop in the chilly wind, I headed down again. It didn’t take me very long to reach the bottom, where I met up with my companion and donning our packs we headed off back down the mountain.

The trip down was a lot quicker than the climb, as you can imagine. It had taken us about 4 hours under pack to climb to Refugio Frey and 2 hours and 30 minutes down again. We were really pushing it, but still missed the earlier bus by 15 minutes. We waited another hour over a couple of beers and caught the next bus back to Bariloche for a well deserved shower.

The Trail Wanderer

El Chaltén, Argentina – Impressions

El Chaltén is a small town at the northern end of Parque Nacional Los Glaciares in Argentina. It’s a town bred purely from the tourism generated by the National Park and Mt Fitz Roy.

DSCN2184

El Chaltén was quaint and had plenty of hostels, although many were aimed more towards the hotel end of the market than to backpackers. There were plentiful tour operators and adventure stores selling the big named adventure gear for both hiking, ice climbing and glacier expeditions. There was also a small cafe/bakery scene in the town which was great, as the hostels don’t provide breakfast.

I stayed at the Hostal Pioneros del Valle. This large and fairly cheap hostel had plenty of rooms, most set up with 6 beds. But as it was low season when I stayed I had the room to myself. Splendid!

DSCN2072

High season is December to the end of March and outside of these times more than half of El Chaltén’s businesses close down. The several restaurants in town are reasonably priced restaurants, including the local micro-brewery, which is good considering the town doesn’t have good facilities for buying your own food. While there are supermarcados, they aren’t very ‘super’.

The National Park had great day walks and several longer hikes – some very intense indeed. Being short on time, I only did a 3-day hikes. It doesn’t have an official name but I called it the Mt Fitz Roy Triangle. The other great advantage of the Parque Nacional is it’s cost. It’s free. Something different in a land of expensive national park entrance fees.

Here are some of the other walks:

  • Cascada Margarita
  • De las Vuetas River Canyon
  • Piedras Blancas Glacier
  • Punta Norte – Hito Limítrofe

Next, I head back through El Calafate to Puerto Natales in Chile to catch the Navimag Ferry

The Lone Trail Wanderer

The Cougals – Cougals National Park

The Cougals National Park is a section of the Springbrook National Park on the border of Queensland and New South Wales. It’s a pair of peaks that rise out of the rainforest, rocky and beautiful.  Note, this is different to the Mount Cougal Cascades, which is not connected to the peaks hike.

The East Peak is the most commonly climbed and is a 8.5km return trip with a moderate grade. The West Peak has a hard grade and is a further 750m across a saddle, giving the total hike of both peaks 10km return.

There is no formal trailhead for the Cougals walk. To get to the beginning of the trail from the Gold Coast cross the border into NSW and then back again along a dirt road named Garden Of Eden Road to a gate where there is room for several cars to park. There are local’s driveways nearby, along with a handmade sign announcing the beginning of the walk and demanding hikers to stay on the track.

IMG_0291

The trail heads west along the fence line between QLD and NSW. The fence has barbed wire along it, but whether it is designed to keep the New South Welsh out of Queensland is unknown. The trail climbs uphill through brush with low branches.

IMG_0292

It had rained this last week, so the dirt here was a little slippery. The brush gave way to tall grasses along the trail, which in turn gave way to thin bamboo growths. The grass overhanging the trail sometimes contained thorny branches. I probably should have worn long pants as I sustained many small scratches by the end of the day.

IMG_0293

The grassy path explodes into rainforest with tall trees and the typical Strangler Figs everywhere. The trail follows the fence line, climbing and descending gentle hills. It’s fairly obvious when you reach the first of the Cougals, the trail climbs steeply with dirt and tree root steps making it slippery after the recent rains. While slipping is the ever-present danger, being snagged on the barbed wire makes climbing even more dangerous.  Caution is suggested.

Atop the steep climb, rocky outcrops stand tall above you with dark brooding caves along its face. We walked along the base of the major outcrop until we found our way to a path that climbed through it. The trail up the rocks was obvious as someone had tied a rope to aid with handholds.

IMG_0311

Once above the rope line, it was an easy climb to the top of the East Cougal and fantastic views of Mt Warning to the South,

IMG_0300

…the rocky face of West Cougal to the West, out to the coast towards the city of Tweed Heads out to the East and Springbrook National Park to the North. On this sunny day, the climb was well worth the effort.

IMG_0299

My companion and I did not stay long, however, deciding to push on before lunch. We climbed down to the saddle between the peaks with only one steep troublesome and slightly precarious climb. The trail crossed the saddle, but unable to find a suitable place to stop we proceeded around the great rocky outcrop known as the West peak, looking for an easy path up.

IMG_0303

The West peak looks to be a hard climb with its many rocky faces. We skirted around it passing a couple of rocky climbing places marked with pink ribbons until we found a dirt path through the undergrowth. It was a little slippery but surrounded by plants that gave plentiful handholds. While finding the route up was not the easiest, climbing up it was fairly straight forward.

Unlike the summit of the East peak, which is small, the West Peak has a large area with meandering pathways and what appeared to be a camp site. We stopped for lunch at the fire pit.


IMG_0308

The descent passed quickly, as it always seems to, and before we knew it we were slogging our way through the tall grasses and back to the car.

The Cougals is an awesome hike and I would recommend it to any fit and capable walker. It’s going down as one of my favourites in this region.

The Trail Wanderer.

Mount Tunbubudla East

Glass House Mountains National Park – again.

After spending 3 days wandering the trail of the Glass House Mountains, I’m back to climb one that doesn’t have one.  This time I’m walking with my hiking group and the mountain is Mount Tunbubudla East, a 300m tall, off track climb and is rated hard, mainly due to it being trackless.

Getting to the mountain is a mission in of itself. The old ‘major road’ that it’s off is actually a boggy dirt road and is untraversable without an off-road vehicle.  We parked at the entrance and as a group walked about a kilometre to the muddy starting point. We waited for others to arrive and find us before we headed off into the untracked grass at the base of the mountain.

I led the way, pushing a path through the long grass for the others to follow.  At the beginning there was a vague track, but this soon disappeared. The initial portion of the climb was up tree laden, broken ground. With no track, I had to evaluate each step and find suitable gaps between tree branches.

The climb became steeper before flattening out the higher we got, but because of the thick tree cover we were unable to see the views. As we approached the top we came to a large rocky area which did allow us a better view, north across the other Glass House Mountains.

IMG_0257

We reached the top and sat for lunch at the rocky cairn. I surveyed the route leading towards the West peak but found it too steep to descend. Alone it would have been fine, but with a large group in tow I made the call to return the way we’d come. This disappointed some, as the climbing down in that direction would have led to the climbing of the smaller,  steeper twin.

IMG_0256

The climb down held the same issues as the climb up – a lack of trail – and it’s also harder to see where you’re putting your feet. I again led, picking our way down the side of the mountain. We arrived at the base in short order and walked across the needle covered grass until we reached the muddy road. We could have climbed the other peak, but the mutual decision was not to. A kilometre later we were at the cars and headed off for a well-deserved beer at the Beerwah Hotel.

Trail Wanderer

D’aguilar National Park

16 June 2012

Rainforest Circuit, Cypress Grove and Greenes Falls.

Maiala

Maps on this page are owned by and used with courtesy of Queensland Government.  Please visit that site for more detailed information on hiking in this region.

While I much prefer harder and rockier walks, there were several walks in the D’aguilar National Park that I had on my list to do. D’aguilar National Park is mainly forest, so it’s trees, trees, trees, and the tracks are well-defined and not terribly difficult.

IMG_0228

To cross them off my list, I headed out with a friend to the Mt Glorious section and walked into the rainforest. It was an entertaining walk in the cool morning air, with large strangler figs in many places.

IMG_0224

The Rainforest Circuit and Cypress Groves were fairly standard fare. Greenes Falls was a great place for a sit down and a chat.

IMG_0236

The falls are fenced off, but this didn’t stop me from climbing the fence and rock hopping down to the edge of the falls.

IMG_0240

Western Window Track

Across the road from the Cypress Grove walks is another tree laden walk along the side of a steeply sloping cliff.

IMG_0246

Morelia Walking Track and Atrax Circuit

manorina

Another slow meander through the forest, climbing fallen giant eucalypts and walking through great burnt out trunks.

IMG_0254

The trail eventually led to the Mount Nebo lookout, and while there is only a limited viewing area, Moreton Bay is visible in the distance.

IMG_0247

Overall, the trails in the D’aguilar National Park aren’t very taxing, but if you enjoy walking in the woods, this is a good place to spend a few hours on a warm sunday afternoon.

The Lone Trail Wanderer

Mooloorah River NP, Dularcha NP, Tibrogargan Circuit

Today was my third day walking in Glass House Mountains.  On Day One I climbed Mt Ngungun and Mt Beerburrum, while on Day Two I climbed Mt Tibrogargan and Wild Horse Mountain. Today I won’t be climbing any of the mountains, instead walking several of the other short walks in and around the Glass House Mountains.

Mooloolah River National Park, Jowarra Section 1.5km

Mooloolah River National Park maps

Map is owned by and used with courtesy of Queensland Government.  Please visit that site for more detailed information on hiking in this region.

There are two short tracks in the tiny Jowarra Section of the Mooloolah River National Park and together they are only 1.5km long.  They are both only class 2 with concrete tracks and no climbing at all.  It was a cool morning when we arrived and much of the beauty was in the mists that hung about trees.  The two simple loops took little time to walk and before we knew it we were back in the car and off to Dularcha National Park.

IMG_0199

Dularcha National Park – 4km

The main draw card for the Dularcha National Park is an old railway tunnel about half way along the trail.

IMG_0201

The trail is wide and easy to follow as it runs alongside the new railway tracks.  Horses and cyclists regularly ride along the trail and while here we saw two different families on their bikes.  This class 3 trail rose and fell slightly as we walked but remained fairly flat.  While not a difficult walk I did break a sweat but more from the direct sunlight than how strenuous the trail was.

IMG_0204

The train tunnel was pretty cool, although was only fairly short.  There are reportedly micro bats living in this tunnel which I was keen to see, but we didn’t find any.

Dularcha National Park map

Map is owned by and used with courtesy of Queensland Government.  Please visit that site for more detailed information on hiking in this region.

The track is linear and after 2km you’re required to walk back along the same trail to the beginning.  On reaching the car, my companion waved the white flag, so I dropped him home and set off alone to do the last couple of more difficult tracks.

Tibrogargan Circuit and Trachyte Circuit – 7.3km

I climbed Mt Tibrogargan on a previous foray into the Glass House Mountains, but around the base of the mountain are a pair of tracks that when joined together are over 7km long.

Glass House Mountains walking track information and maps

Map is owned by and used with courtesy of Queensland Government.  Please visit that site for more detailed information on hiking in this region.

The Tibrogargan circuit (‘a’ on the above map) leads around the mountain to a T-junction where one branch heads back to the car park, the other is where  Trachyte Circuit (‘b’ on the above map) begins, cutting across the valley towards Mt Tibberoowuccum to a lookout before returning to the car park.  The trails are class 3 and class 4 respectively with a short climb to the lookout on the Trachyte Circuit.

IMG_0209

The views from the trail consist mainly of trees with the occasional creek crossing.  I stopped in several places to peer through the trees at one of the neighbouring mountains, but most did not give clear enough views to take photos.

IMG_0210

The most difficult part of the walk was the 100m section up to a Tibrogargan Circuit, where I chatted to some English tourists about New Zealand.

IMG_0211

The remainder of the track was fairly gentle and after a total of about an hour and a quarter I returned to the car park.

It was a good day of walks on Queensland’s Sunshine Coast and while I hadn’t planned any further walks in the Glass House Mountains National Park, my hiking group had other ideas. In a month they plan to climb the Tunbubudla Twins, a pair of small peaks at the southern end of the National Park.

Next I head to The Cougals for something more difficult hard to dig my teeth – or feet – into.

The Lone Trail Wanderer.

West Canungra Creek Circuit – Green Mountains

Lamington National Park: Green Moutains section map

Map is owned by and used with courtesy of Queensland Government.  Please visit that site for more detailed information on hiking in this region.

Today I’m out with my hiking group from meetup.com.  Meetup.com is a great way to find hiking groups in your area and they often go to many interesting places.  The downside of meetup.com groups is they tend to attract larger groups of walkers and can be more about being social than the experience of being out in nature.

IMG_0148

This time we headed into the Green Mountains section of the Lamington National Park to do one of the many circuits.  This is also where I began the Gold Coast Hinterland Great! Walk only three weeks earlier.  The hikes start at the same location and use about a kilometre of the same trail before splitting off and going their respective directions.

IMG_0150

The West Canungra Creek circuit has a Class 4 rating but I believe this is only when it is wetter.  Because it was pretty dry and the streams were down,  the crossings were easier and the rating should only be a Class 3.

IMG_0153

The circuit is 13.9km long and meanders down towards Canunga Creek.  It then heads along the stream, with several crossings towards to “Yerralahla” (blue pool).  There were plentiful small waterfalls, downed trees, rocky outcrops and stream beds along the way.

IMG_0170

About half way around the circuit, the track forks, eventually meeting up again a couple of kilometres along.  At the fork I decided to take my leave of the group to get a bit of time to myself in nature.  As I walked I came across a pair of large waterfalls.

Yanbacoochie Falls…

IMG_0178

Elabana Falls…

IMG_0182

I met up with the group again when the trails reconnected.  We continued our way back along towards the end of the circuit, crossing a treetop walk on the way back.

IMG_0184

Overall an interesting walk and talk, I got to speak at length to a guy from Chile about South America, the starting place of my big adventure next year…

Next week, I wrap up the Glass House Mountains and do a couple of short walks at Mount Coot-tha.

The Trail Wanderer.

Glass House Mountains – Mt Tibrogargan and beyond

I’m back this week to climb more of the Glass House Mountains.  Last week I managed both Mt Ngungun and Mt Berrburrum and this week I try for two more, Mt Tribrogargan and Wildhorse Mountain, as well as wandering around the base of Mt Beerwah and the Glass House Mountains Lookout. I would have liked to have climbed Mt Beerwah as it’s the tallest of the Glass House Mountains, but due to a landslip it’s closed.

Mt Tibrogargan

IMG_0097

I had some trepidations about climbing Tibrogargan as it’s listed as a Class 5 with some scrambling and steep rocky faces, but it’s on the list so I wanted to do it.  I set out with a colleague and we drove to the Glass House Mountains.  Mt Tibrogargan is one of the more prominent of the mountains and is said to look like an ape.

IMG_0113

The walk to the base is along a fairly standard gravel path that turns rocky and begins to climb slowly towards the base.

It’s not long before Tibrogargan appears out of the trees and you are confronted by the first rock face.  It’s literally climbing rock face after rock face all the way to the top.  There are no nice steps formed in mud and tree roots, it’s all rocky.  It’s not so steep that rock climbing gear is required, but definitely not for the faint hearted.

My companion felt discouraged early and chose to return to the bottom, which is understandable, as it’s a daunting prospect.  I, however, pushed on.

IMG_0107

There were some points on the way up where I felt nervous, but I didn’t let them hold me back and kept climbing.  The views were good on the way up, but you don’t spend much time looking around while climbing.

IMG_0105

At the top, there’s plenty of scrub and the views aren’t so apparent.  I did get the odd photo, but compared to Mt Ngungun the view is mainly hidden behind trees.  At the top I ran into a woman fossicking in the bushes.  Apparently she was looking for a geo-cache – a box someone has set here at a certain GPS location.  I fossicked in the bushes with her for a while looking for it but after a while we gave up and climbed back down.

Glass House Mountains walking track information and maps

Map is owned by and used with courtesy of Queensland Government.  Please visit that site for more detailed information on hiking in this region.

It was good to have her along as she’d done this climb on many occasions and gave me guidance on the best way down.  She also told me about the aboriginal history of the Glass House Mountains.  Then at the bottom, I bid her farewell, collected my companion and we headed off to the next mountain.

Wild Horse Mountain

Compared to Mt Tibrogargan, Wild Horse Mountain is a molehill.  A 700 meter path up to a look-out.  A woman on the way down commented how much easier it was coming down.  If only she knew that we’d just come from Mt Tibrogargan.  And honestly, getting out of bed that morning was more difficult than climbing Wild Horse Mountain only because it was a little chilly getting out of bed.  As for Wild Horse Mountain, I wasn’t expecting much of a climb.

IMG_0116

It was as easy as expected and didn’t take us long to reach the lookout at the top.  The views are nothing short of spectacular.  You can see all the Glass House Mountains, the scenic rim and out to the sea on the other side.

IMG_0118

Glass House Mountains Lookout

The Glass house Mountains Lookout is at the western end of the Glass House Mountains and while not actually climbable, it does have an 800m bush walk through the forest.  In general the views were not a good as those from Wild Horse Mountain and there wasn’t much to see along the walking trail.

IMG_0124

Mt Beerwah

To cap off the day we drove to the base of Mt Beerwah, passing the unclimbable Mt Coonowrin.

IMG_0129

Mt Beerwah is more daunting than Mt Tibrogargan, but due to a rockslide that has blocked the path it was deemed too dangerous and closed.  As the tallest mountain in the National Park it would have been nice to have climbed it.  I’m told it is a similar experience to climbing Mt Tibrogargan.

IMG_0132

There were several more walks in the Glass House Mountains I wanted to do and came back twice more to complete them.  Details can be found here: Mooloolah River, Dularcha NP, Tibrogargan and Trachyte Circuits and Mount Tunbubudla East.

The Lone Trail Wanderer.

Glass House Mountains – Mt Ngungun and Mt Beerburrum

While not all of Glass House Mountains are climbable for various reasons – dangerous landslips, suitable only for rock climbing, too steep, sacred to aboriginals etc – I decided to climb all I could and walk the tracks near the ones I couldn’t.   I split my walks over several weekends.  Here are my first couple…

Mt Ngungun

IMG_0008

I decided to climb Mt Ngungun because I liked the name, although at 253m it’s only considered a hill.  On this day, I took along 3 companions, proving that the lone wanderer does not always wander alone.  The climb is rated a class 4 – distinct track usually with steep exposed slopes or many steps.  Caution needed on loose gravel surfaces and exposed outlooks.  Moderate level of fitness.

Glass House Mountains walking track information and maps

Map is owned by and used with courtesy of Queensland Government.  Please visit that site for more detailed information on hiking in this region.

The walk through the forest to the base of the mountain was short and easy.  But when we arrived at the base we certainly knew it.  The fairly flat path turned into a steep, perhaps 60º climb up a rocky, tree root laden dirt trail.

IMG_0014

It’s recommending not to climb Mt Ngungun after it has been raining and it’s easy to see why, the rocky-dirt steps would be very slippery.

The initial section of the climb is a wide channel between a rocky outcrop and the mountain.  It didn’t take me long to reach the top of the first climb, the hardest section.  As I waited for my companions I peeked through the trees and got only a hint of the views we’d eventually see at the top.

After a short break, and leaving one of our companions behind, we continued up the next portion of track, another rocky, root laden climb, at perhaps 45-degrees.

IMG_0018

Finally there was a gentle climb along a short ridge to the very top and some fantastic panoramic views.  To the east out past the city of Caloundra and the Pacific Ocean.  To the west the edge of the scenic rim and to the north and south the other jutting Glass House Mountains.

IMG_0035

The climb down was fairly straightforward.  Overall a fun climb that took a total of just over an hour including the break at the top.

IMG_0037

Back at the car, we headed to the location of our second climb of the day…

Mt Beerburrum

Anything with beer in its name has to be good, right?

Glass House Mountains walking track information and maps

Map is owned by and used with courtesy of Queensland Government.  Please visit that site for more detailed information on hiking in this region.

Mt Beerburrum is a totally different climbing experience to that of Mt Ngungun.  It’s advertised as a Class 4 also, but with a 700m steep walk.  After a gentle climb up to the car park at the base of the mountain, the concreted path took a sharp change, a 45-degree upwards change.  Climbing a 45-degree grade is no problems when there are steps, even rough dirt steps such as was the case on Mt Ngungun.  But Mt Beerburrum has no steps, not a single one, just a concrete path.  And other than several switchbacks in the path it’s hard going with little respite.  For my companions and I this meant stopping every 20-30 meters to break up the relentless climbing of the path.

IMG_0043

It does eventually flatten out and leads to a fire tower.

IMG_0053

Then a simple climb to the first level of the fire tower gives the same amazing panoramic views as Mt Ngungun just several kilometres to the south.  While difficult, for the view the pain of the climb is well worth it.

IMG_0044

The walk down was slow going and the steep path was hard on the knees.  Weaving along the path made it a little easier.  At the bottom, the reason the word Beer in the name becomes apparent and has nothing to do with the nearby township of Beerburrum, honestly.  It’s that we really needed one.

Overall, it was a good day’s climbing.  I could have done more, but I didn’t want to push the limits of my companions, so left it at that.

The Trail Wanderer